Before you get started, please be sure to always check out these documentation files. To install this theme you must have a working version of WordPress already installed and configured on your machine or server. For a detailed guide on installing WordPress, please visit the WordPress Codex installation documentation. Below are all the useful links for WordPress information.
Minimum requirements
To use Transfers, please make sure you are running WordPress 4.6 or higher, PHP 5.6 or higher, and MySQL 5.6 or higher.
WordPress recommends PHP 7.0 or higher. Other PHP versions have reached the end of their life cycle and may expose your site to security vulnerabilities. There is a significant reason to no longer use old PHP versions, always update to the latest versions.
- Check to ensure that your web host has the minimum requirements to run WordPress.
- Always make sure they are running the latest version of WordPress.
- You can download the latest release of WordPress from the official WordPress website.
- Always create secure passwords for FTP and Database.
Recommended PHP Configuration Limits
Many issues that you may run into such as: white screen, your demo import fails, empty page content with Fusion Builder and other similar issues are all related to low PHP configuration limits. The solution is to increase the PHP limits. You can do this on your own, or contact your web host and ask them to increase those limits to a minimum as follows:
- max_execution_time 180
- memory_limit 128M
- post_max_size 32M
- upload_max_filesize 32M
Licenses
When purchasing Transfers from ThemeForest, you have two licensing options. The Regular License, and the Extended License. To learn more about what each License is for and which one to purchase, continue reading below.
Click Here To View License Information
Buy Another Transfers license!
Common Questions
1. If I need to use Transfers on a second site, do I need a second license?
Yes. One purchase of Transfers allows you to use the theme on one finished site. If you need to use it on a second site, it requires you to make a second license purchase.
2. Can I use Transfers on a test site, then move it to a live site when finished?
Yes, you can. You can keep the theme on a test site to build it, then move it to the live site once you’re finished.
3. Can I keep a test site and a live site with one Regular License purchase?
According to the licensing rules set by Envato, this is not allowed. If it is installed in two places permanently, then it requires two licenses.
Item Support
All of our items come with 6 months of included support and free lifetime updates for your theme. Once the 6 months of included support is up, you have the opportunity to extend support coverage for 6 or 12 months further. If you choose to not extend your support, you will still be able to submit bug reports via item comments and still have access to our online documentation and theme updates.
Envato clarifies item support here http://themeforest.net/page/item_support_policy
We have an advanced, secure ticket system to handle your requests. Support is limited to questions regarding the theme’s features or problems with the theme. We are not able to provide support for code customizations or third-party plugins. If you need help with anything other than minor customizations of your theme, we suggest enlisting the help of a developer.
How To Renew or Extend Support
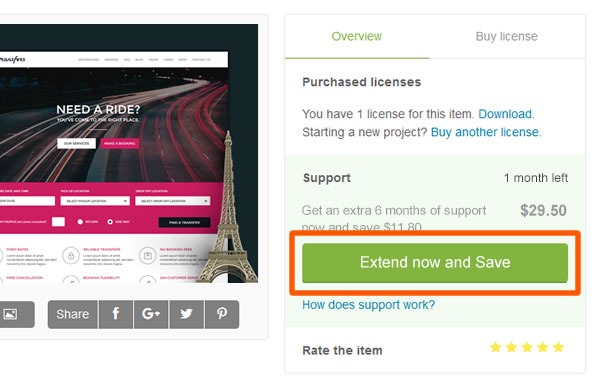
You are eligible to renew or extend your support subscription if you have less than 6 months support remaining and the author is still supporting the item. The cost of purchasing support can vary according to the different periods of your subscription. For example, extending your support subscription while it’s still active costs less than renewing it when it has expired. To learn more about this, please read Envato’s ‘Extending and Renewing Item Support’ article.
- Login to your ThemeForest account and go to the Downloads tab.
- Locate your Transfers purchase. On there, you’ll see how many months of support you have remaining, and beside it there’s an ‘Extend Now’ link.
- Click the ‘Extend Now’ link, and it will redirect you to the Transfers Theme’s item page.
- On the right hand side, click the ‘Extend Now and Save’ button.
- Once you click the ‘Extend Now and Save’ button, you’ll be redirected to the checkout page. Confirm your payment details and follow the on screen prompts to finish purchasing the extension.
What Will Happen If I Do Not Renew The Item Support?
The only thing that changes is that you will not be granted access to hands on support. You will however continue to receive theme updates that contain bug fixes, patches and new features and access to our online documentation, help files, and public tickets.
When Can I Renew The Item Support?
There are 3 scenarios for when you can extend or renew item support; At the time of purchase, during your support period, and after your item support has expired.
- Support Upgrade: At the time of purchasing the item. This will cost 37.5% of the item price.
- Support Extension: Extend item support before it expires. This will cost 62.5% of the item price.
- Support Renewal: Renew item support once it has expired. This will cost 82.5% of the item price.
Envato purchase code
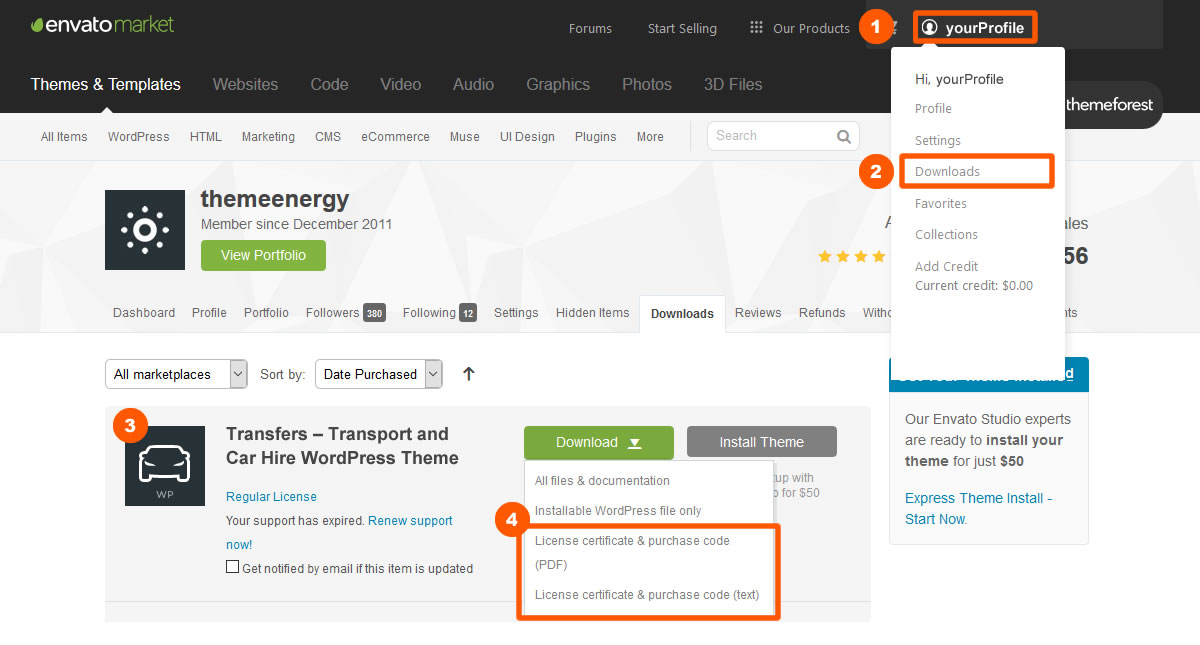
Envato provides you with a purchase code for each item you purchase. Please read below for instructions on how to download your purchase code.
- Login to your ThemeForest account and go to the Downloads tab.
- Locate your Transfers purchase in the list of items you have bought.
- Click the “Download” button to activate the dropdown menu.
- Select to download the license certificate and purchase code as a PDF or Text file. Open the file to find the purchase code. Example Purchase Code: 91d36x28-ddd5-4q70-a109-c9wc8aac6a16
Introduction
Transfers – Transport and Car Hire WordPress Theme is a Premium WordPress theme designed specifically for Transport, Car Hire and Transfer providers.
It comes with a powerful and fully working booking system, an availability manager and with advanced search results. You can create any and as many vehicle types and add additional items that can be bought along per each transfer. Seamless WooCommerce integration for the online booking System supports PayPal (for accepting credit card & PayPal account payments), Direct Bank Transfer and Cash on Delivery.You have the option to choose, whether you want to use the full booking system with payments or use only the reservation system with no payments and manual booking confirmation.
Theme Installation
With your purchase of this theme, the first step is to download the package from ThemeForest. Move your mouse over your ThemeForest Login name in the right top corner and click Download. You will see the number of items purchased, along with the package’s content, as shown in the following diagrams.
Next, click Download > All files & documentation next to the Transfers theme and save the package on your computer.
The download includes documentation, license, sample content and zipped file with the Transfers WordPress theme. Unpack the entire package after downloading.

Uploading your theme
Before you can complete the installation, make certain you have unpacked the entire package. You can complete the installation in either of two ways:
Upload via FTP:
- Firstly, unzip the zip file you downloaded from ThemeForest to a directory on your computer.
- Locate an archive named Transfers.zip which is your installable WordPress theme file.
- Unzip this archive and upload the Transfers folder to your server via ftp to the /wp-content/themes/ directory inside your Wordpress installation.
- Go to WordPress Dashboard > Appearance > Themes and activate the newly installed theme.
Installation via WordPress
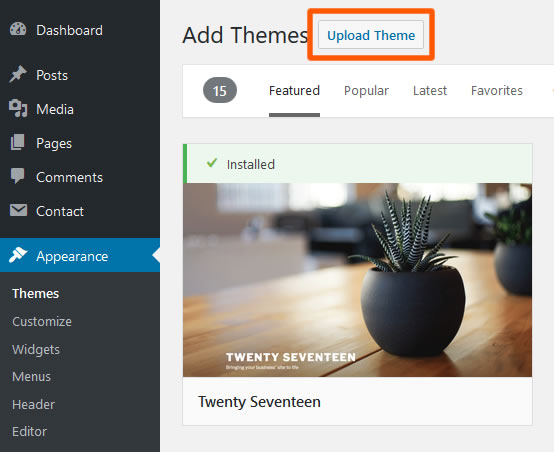
- Navigate to WordPress Dashboard > Appearance > Themes.
- Click the Add New button on top of the page, then the Upload Theme button.
- Click Choose File and find the theme files you’ve just downloaded.
If you’ve downloaded the installable WordPress file, then you do not need to unzip the file.
If you’ve downloaded All files and documentation, you have to unzip the master Transfers_WP_theme.zip file, therein you will see a secondary Transfers.zip file, this is the one you select to install.
- Once the file has uploaded, go to WordPress Dashboard > Appearance > Themes and click the Activate button.
- Once you activate the theme, you’ll find a prompt to install required plugins which we will cover in the next chapter.
“Are You Sure You Want To Do This?”
If you get this message when installing the theme via WordPress, it means you have an upload file size limit that is set by your host. If this happens, please install the theme via FTP or contact your hosting company and ask them to increase the limit.
Plugin activation

After theme activation a prompt to install required plugins will appear in your dashboard. If you have dismissed the notice you can access the page by navigating to WordPress Dashboard > Appearance > Install Plugins.
The Transfers plugin must be installed and activated at all times for the theme to work properly.
Other included plugins are Premium Plugins that are bundled with the theme purchase and do not require additional licensing in order to use them with the theme.
Installing and activating any of the recommended plugins is optional however it is recommended that you first install and activate these plugins before starting the sample content import. That will ensure the demo content for that plugin is imported.
Importing the demo content
In your downloaded file, locate the folder called SampleData.
Within this folder you will find your sample data file(s).
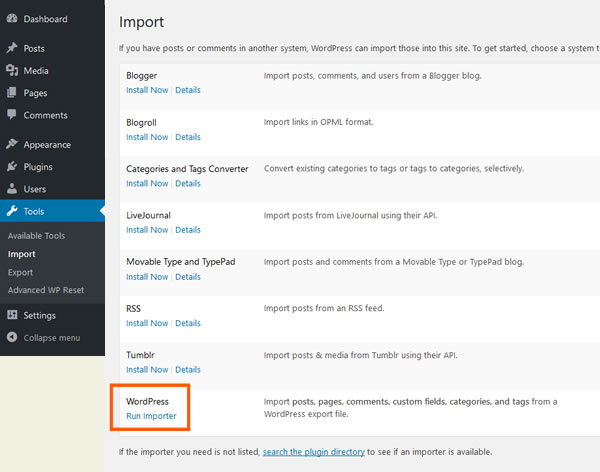
- Browse to Tools > Import
- Enable the WordPress import tool
- Click Browse button and select transfer.sample.xml file
- Select an username, enable "Download and import file attachments" and click Submit
Importing widgets
In order to be able to fully replicate our demo website we strongly recommended importing widgets as-well.
Install the Widget Importer & Exporter plugin by navigating to Plugins > Add new.
Locate the transfers-widgets.wie file found in the SampleData folder and import it by using the plugin.
First steps
After the import is complete you should have all the posts, pages and custom posts from the demo.
There are certain things a WordPress import can not do, so after uploading the sample data make sure you do the following:
- Go to Appearance > Theme Options to setup your theme options.
- Go to Appearance > Menus to set your menu locations.
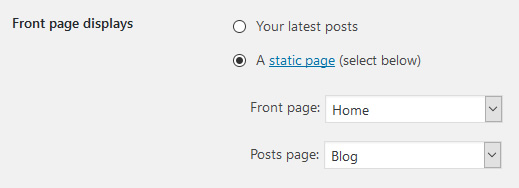
- Go to Settings > Reading and under "Front page displays" select A static page and select your home and blog pages.
- Go to Settings > Permalinks and configure your permalinks structure (Select Post name).
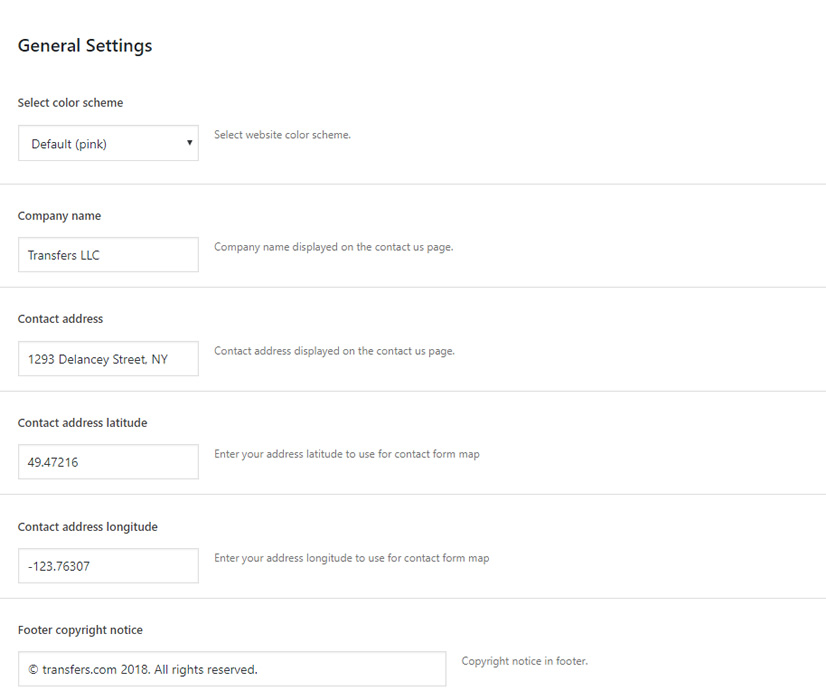
General settings
To make full use of the rich set of features provided by the Transfers WordPress theme, you must configure the theme options.
To begin configuring theme options, go to Appearance > Theme Options.
The general settings tab allows you to select the theme color scheme, set your company information, copyright etc.
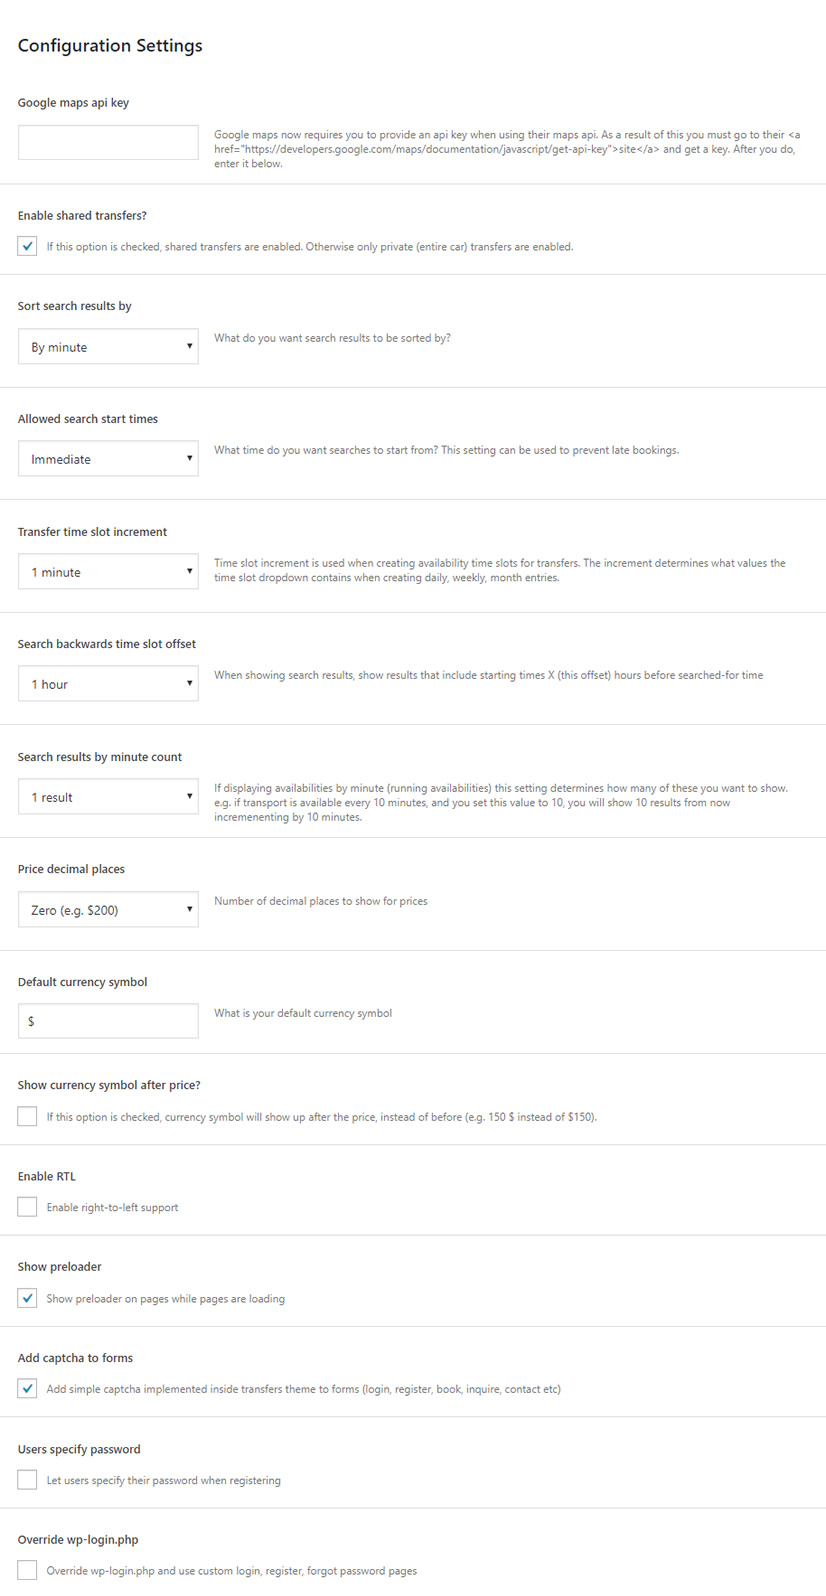
Search & Configuration settings
The Configuration Settings tab allows you to customize theme specific configuration features:
- Override wp-login.php and use custom login, register, forgot password pages instead.
- Set time slot increment value for creating availability entries for transfers (are transfers available every 30 minutes, 1 hour, 2 hours etc)?
- Set price decimal places to be used across the website.
- Set default currency symbol to be used across the website.
- Indicate whether to show currency symbol before or after price.
- The enable RTL option allows you to enable right-to-left language support.
- Set whether you want to show or hide the preloader on all Transfers theme pages.
- Enable and disable using captcha to validate forms on all Transfers theme forms.
- Override wp-login and use custom made login/register pages.
- Allow users to set their password when registering.
Search settings explained
Allowed search start times: What time do you want searches to start from? This setting can be used to prevent late bookings.
Transfer time slot increment: Time slot increment is used when creating availability time slots for transfers. The increment determines what values the time slot dropdown contains when creating daily, weekly, month entries.
Search backwards time slot offset: When showing search results, show results that include starting times X (this offset) hours before searched-for time
Search results by minute count: If displaying availabilities by minute (running availabilities) this setting determines how many of these you want to show. e.g. if transport is available every 10 minutes, and you set this value to 10, you will show 10 results from now incremenenting by 10 minutes.
When a search happens, the availability checker will look through your search settings and availability entries and display valid search results.
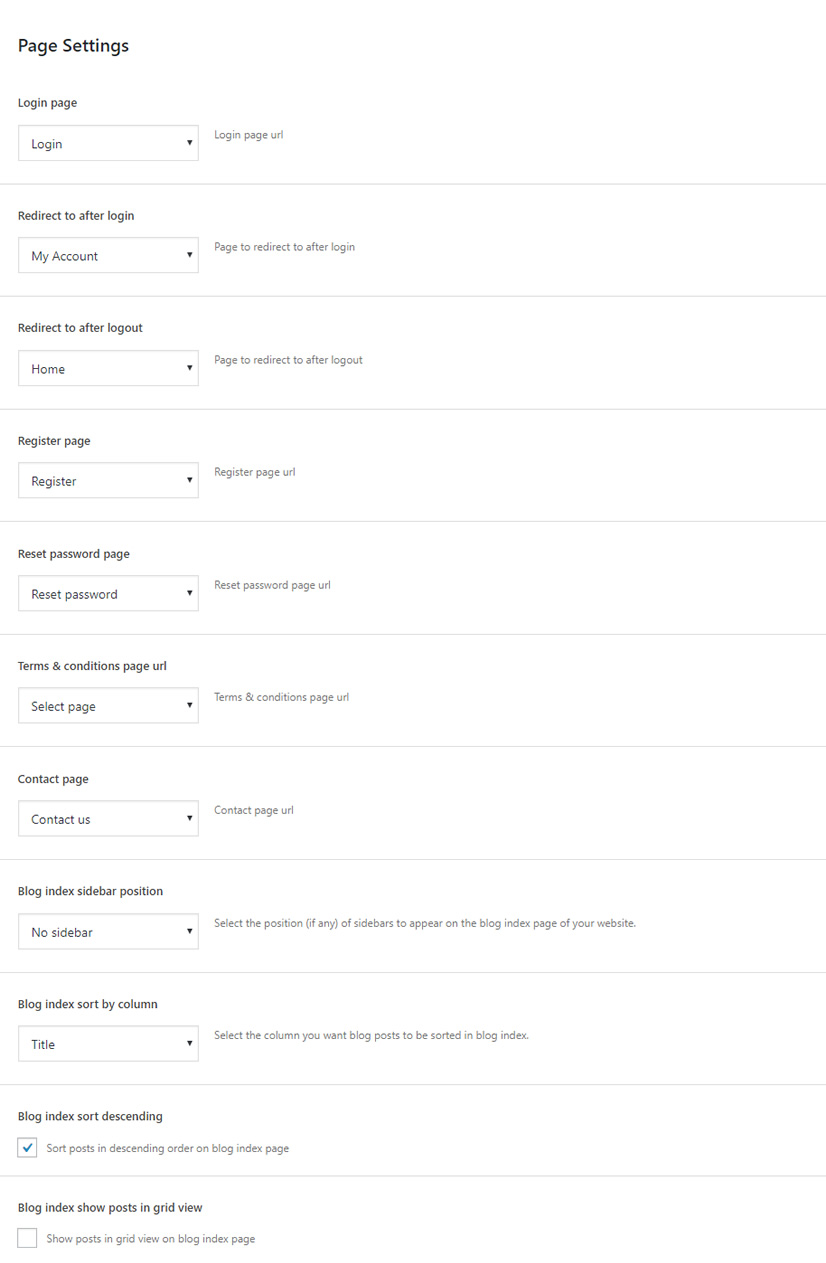
Page settings
Here you link to various pages that you create for specific purposes (login, register, reset password etc). These pages must first be created by you via the Pages section.
You can therefore configure the following pages to be used across the theme:
- Page to redirect to after login
- Page to redirect to after logout
- Login page url
- Register page url
- Contact Us page url
- Reset password page url
- Terms &:; conditions page
- Contact page
- Blog sidebar position
- Blog page posts sorting order
- Blog page layout (grid vs. list)
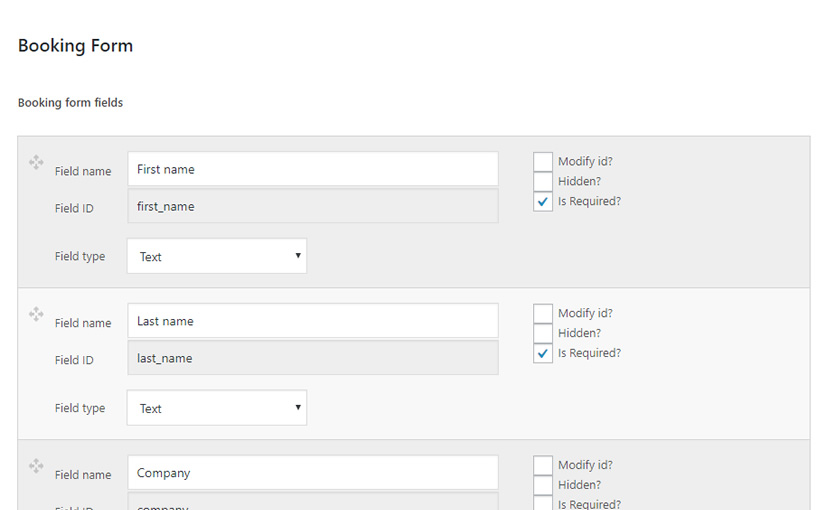
Here you can dynamically control what fields are shown in the booking form. You can add new fields or hide/show existing fields, make fields required etc.
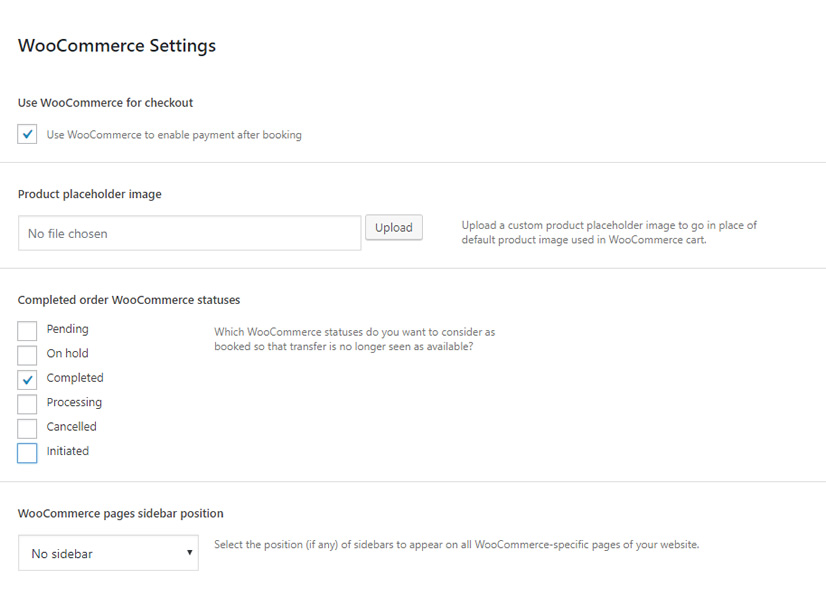
Payment settings
- Install and activate the WooCommerce plugin
- Navigate to Appearance > Theme Options > WooCommerce settings and enable "use WooCommerce for checkout"
- Define what WooCommerce order statuses you want to consider as booked
- Save settings
- Navigate to WooCommerce > Settings > Checkout and set your payment gateways up.
Instructions for handling WooCommerce orders and more information about WooCommerce order statuses can be found here.
Vehicle types
Important
Before you can configure bookable transfers, you need to create at least one Transport type.
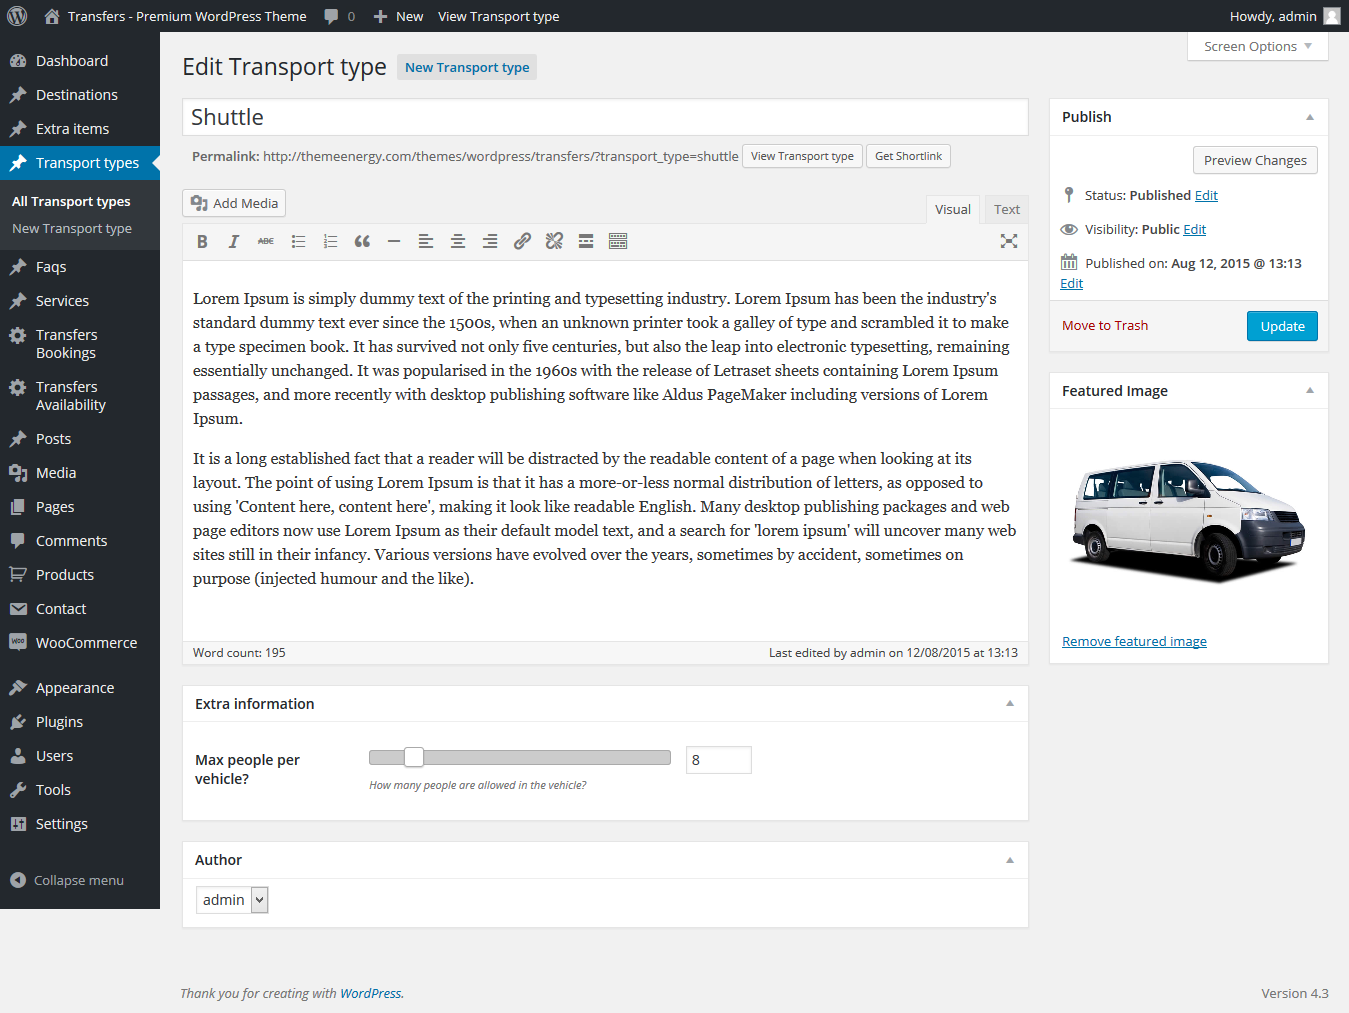
Transport types are a complex custom post type that makes up a key part of the Transfers - Transport and Car Hire WordPress Theme.
You can create any and as many types of transport as you wish, such as: bus, car, helicopter, ship, shuttle etc.
To create a Transport type please navigate to Dashboard > Transport types > New Transport type and create a new transport type.
When creating a transport type you can indicate the maximum number of people a transport type allows, a value which is then used later on in the booking process to limit the count of people that can book an available transfer.
Important
You must first create at least one Transport type before creating extra items.
Before you can configure bookable transfers, you need to create at least one Extra item.
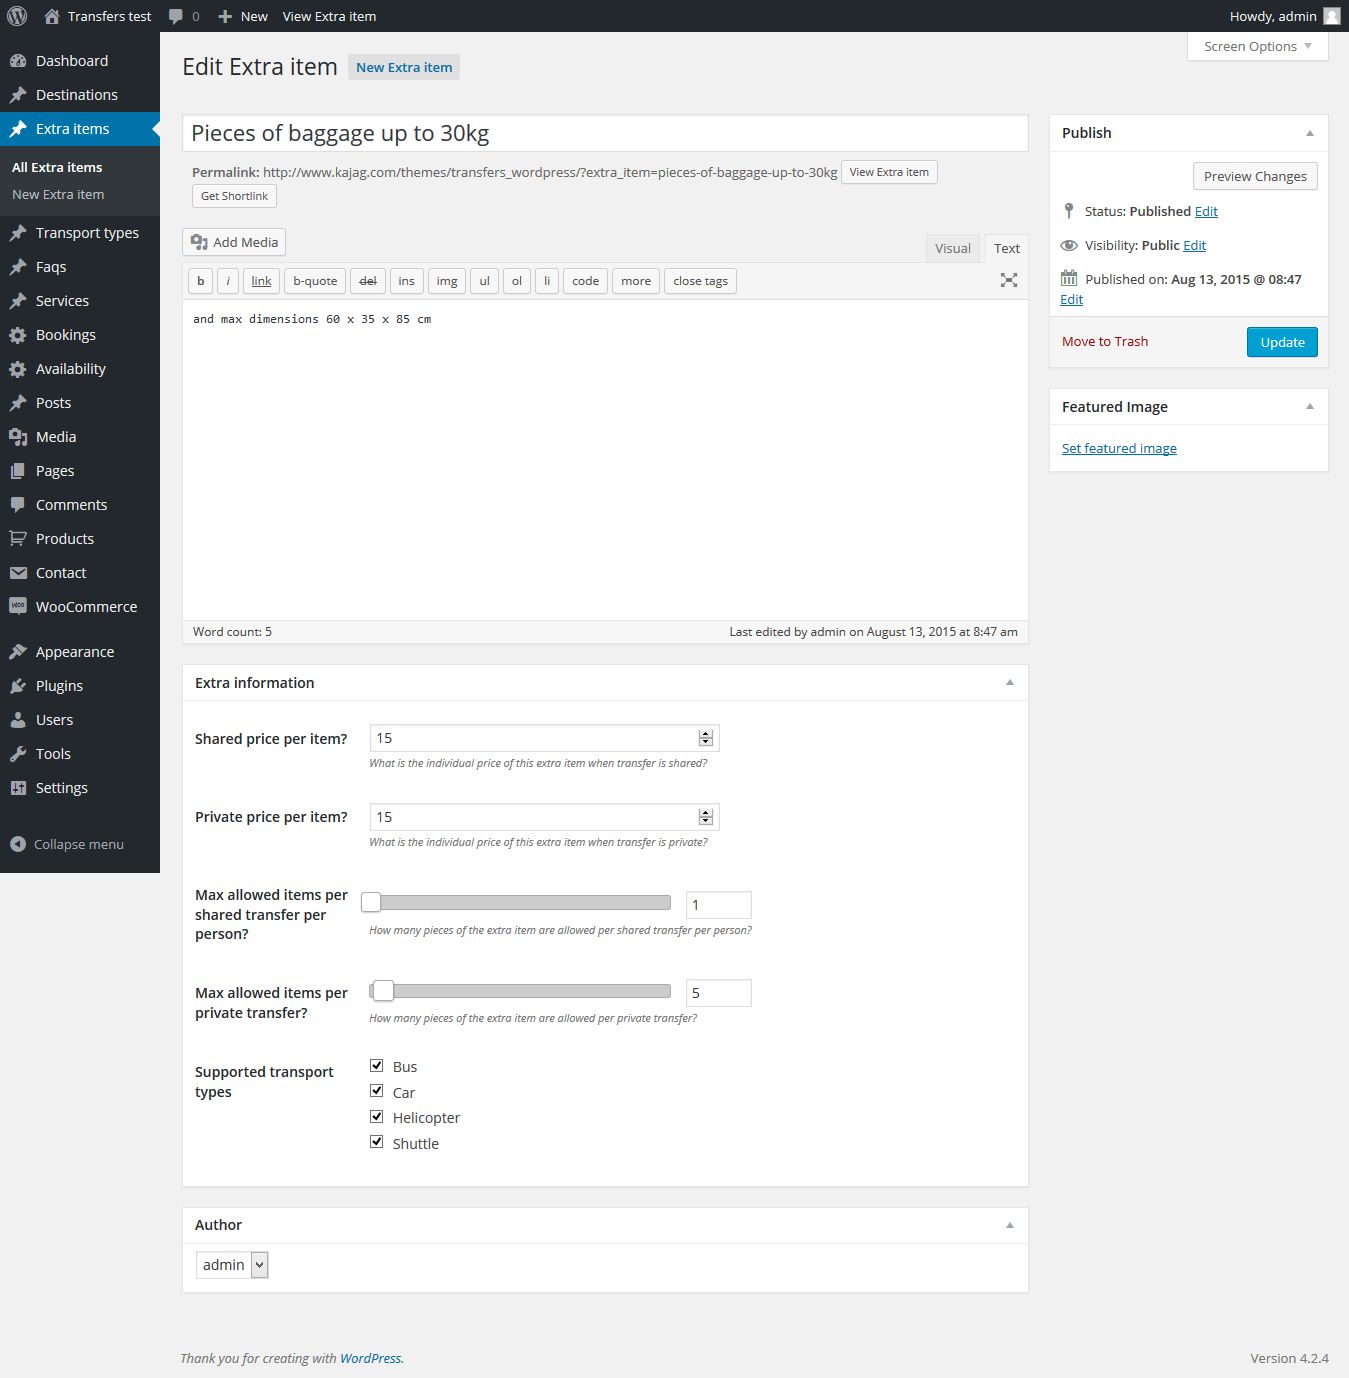
Extra items are items that users can then add to their booking when booking a transfer with a transport type.
So for example a transport type would be a limo and an extra item would be a piece of baggage.
To create an Extra item please navigate to Dashboard > Extra items > New Extra item and create a new Extra item.
When creating an extra item you can indicate the maximum number of extra items allowed, as well as the price of an extra item when a transport type is hired privately as opposed to in a shared arrangement. These values are then used later on in the booking process to limit the count of people that can book an available transfer.
Shared price per item: What is the individual price of this extra item when transfer is shared?
Private price per item: What is the individual price of this extra item when transfer is private?
Max allowed items per shared transfer per person: How many pieces of the extra item are allowed per shared transfer per person?
Max allowed items per private transfer: How many pieces of the extra item are allowed per private transfer?
Supported transport types: Which transport type(s) can transfer the item?
Destinations
Important
Before you can configure bookable transfers, you need to create at least one destination.
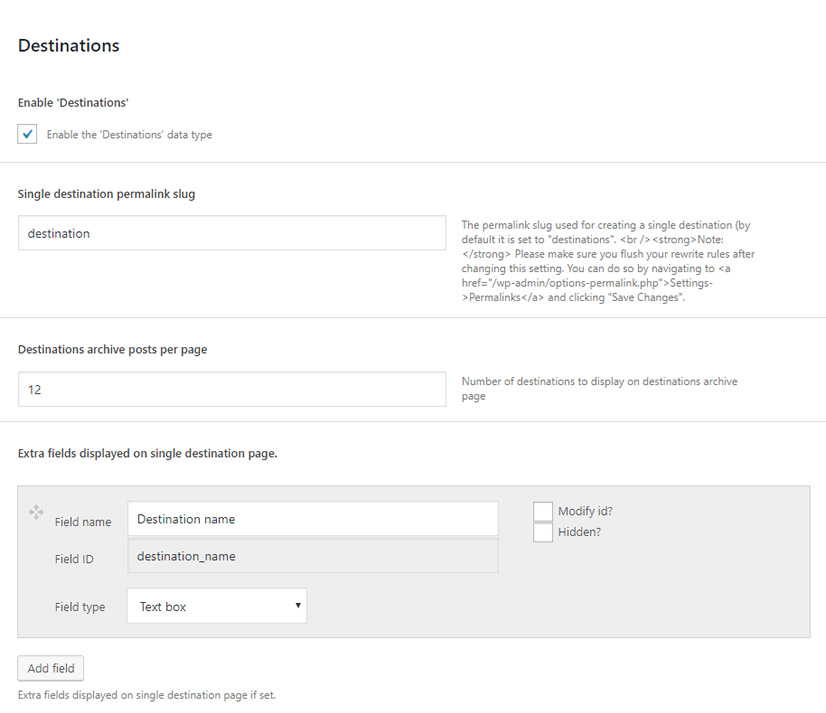
Destinations make up a key part of our booking system as a transfer occurs when a customer books a transport type from one destination to another. A transfer can be booked between any two destinations with a valid availability entry.
To create a destination please navigate to Dashboard > Destinations > New Destination and create a new destination.
You can create nested destinations when creating a New Destination by setting the Parent of the destination to another Destination you created previously.
You can create lists of destinations by creating a New Page using the Destination list page template.
You can create additional fields for a destination by navigating to Appearance > Theme options > Destinations and creating fields there. Once Saved, they will then appear when you edit individual destinations.
Before your site is ready, please go to Appearance > Theme options > Destinations and set a single destination permalink.
After you click Save, you must navigate to Settings > Permalinks and click Save to recreate site permalinks.
Services
Services are a simple custom post type used by Transfers theme to allow you to create descriptive texts of the services your business offers.
To create a service, simply go to Dashboard > Services > New Service and enter a title and content. If you wish to do so, you can set a featured image for your service as well.
Once you are happy with the services you created, you can list them on your website by creating a new page using the Service List Page page template.
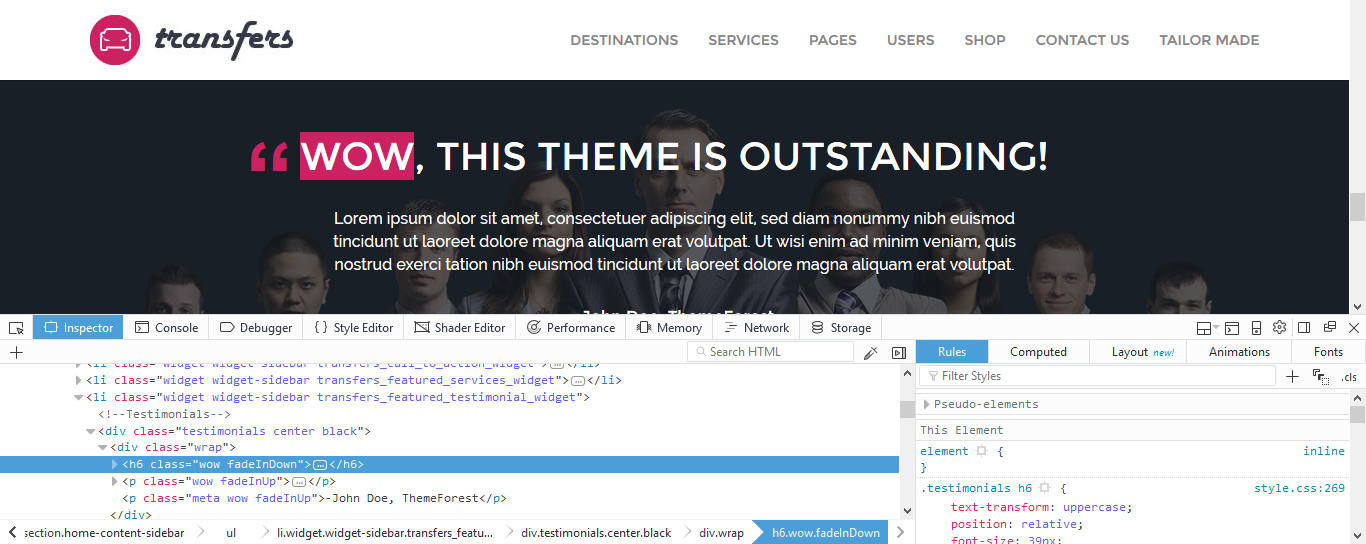
You can also display your services in a widget using the Transfers Featured Services Widget which you can add to any sidebar you want.
Faqs
Faqs are a simple custom post type used by Transfers theme to allow you to create frequently asked questions and answers for the same.
To create a faq, simply go to Dashboard > Faqs > New Faq and enter a title, content - your question goes in the title, your answer goes in the content. If you wish to do so, you can set a featured image for your faq as well.
Once you are happy with the faqs and answers, you can list them on your website by creating a new page using the "Faq List Page" page template.
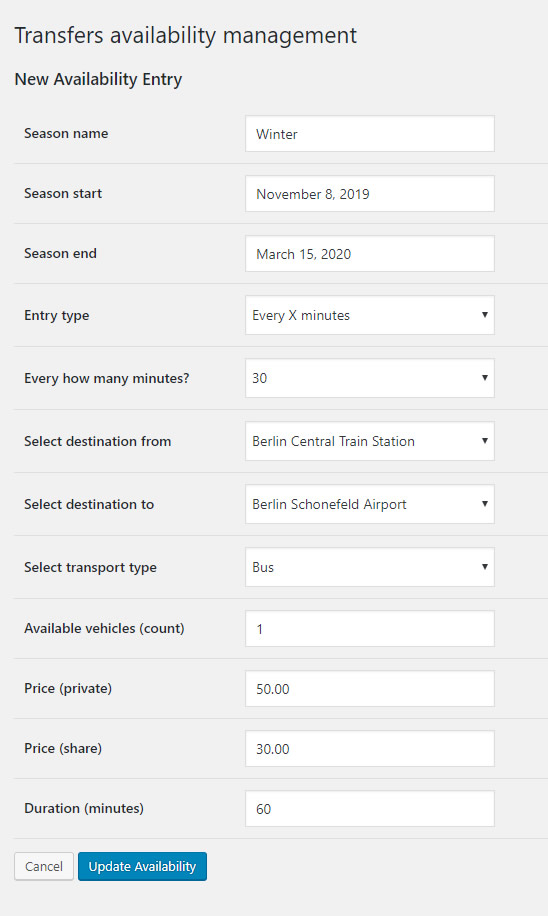
We have created a really simple interface with very powerful features. All you need is to fill in the data and we will take care of the rest.
To create availability, please navigate to Dashboard > Availability and click Add Availability. When creating an availability, think of each availability entry as a season.
Season name: Name of the season for making seasonal pricing. These can for example be: Low Season, High Season etc. or All Year for using the same prices througout the year(s). You can name them anyway you want.
Season start: Start date of the season
Season end: End date of the season
Entry type: Used for automaticaly repeating and creating availability. You can choose from: Every X minutes, Every day, Once a week and Once a month
Every how many minutes: If "Every X minutes" is selected another dropdown will be shown for you to choose on how many minutes the transfer repeats. If any of other entry types are selected you will see only a timeslot field for setting an onetime departure.
Day of week: this dropdown appears if the transfer is repeated "Once a week".
Select destination from: PickUp destination
Select destination to: DropOff destination
Select transport type: A dropdown list of all available transport types. You need to select what transport type is available per availability entry.
Available vehicles (count): Number of vehicles available per availability entry
Price (private): Price for (entire) private vehicle. If left 0 the price will not appear and the vehicle will not be able to be booked privately.
Price (share): Price per person in a shared vehicle. If left 0 the price will not appear and the vehicle will not be able to be booked as a shared arrangement.
Any to Any availabilities
Besides A to B availabilities you can create Any to Any, Any to A and B to Any availabilities. Availabilities created this way will have the same price for all destinations and transport types that they are created for.
Transfer duration
The transfer duration field is used to determine for how long the car will be unavailable while the trip happens (during booking) so that noone else books this trip at this time.
Bookings
Important
If WooCommerce is used for bookings you must define what WooCommerce statuses do you want to consider as booked so that transfer is no longer seen as available via Appearance > Theme options > WooCommerce settings.
Instructions for handling WooCommerce orders and more information about WooCommerce order statuses can be found here.
The booking process is divided into the following logical steps:
- User selects desired transfer
- User add sextra items to the transfer
- User enters his personal information
- User makes a reservation/booking (depends on whether you are running the full booking system or reservations only)
- Confirmation email is sent to the user and website owner
When a booking is made, the system will always deduct items correctly. You also have the option to choose, whether you want to use the full booking system with payments or use only the reservation system with no payments and manual booking confirmation.
You can view bookings created on your site via Dashboard > Bookings
If you choose to enable WooCommerce integration (Appearance > Theme options > WooCommerce settings - visible after you install and activate WooCommerce plugin) then Bookings are integrated with WooCommerce as-well and can be seen via WooCommerce > Orders.
Fonts
Real time font customizer will be available with the next theme upgrade. In the meantime you can use Easy google fonts.
Icons
There are 2300 custom font icons included. HTML looks like this:
Class icon should always be included. The other css class, that defines which icon is used, is optional. A list of all available icons, with respective css classes, can be found inside the /fonts/font-preview/demo.html file. Simply open the file in your browser for viewing the icons.
Colors
Real time color customizer will be available with the next theme upgrade. For now, there are 15 ready to use color schemes provided, but you can also create your own with the colors you like.
To do so, simply open one of the existing color schemes (e.g. Transfers/css/theme-orange.css) and copy its contents to your code editor. Replace the hex codes with your own and paste the code into Admin > Customize > Custom CSS field. Save changes.
Adding custom css
Starting with WordPress 4.7, you can now add custom CSS to your own theme from Dashboard > Appearance > Customize Screen, without the need for additional plugins or directly editing themes and child themes. Just choose the Additional CSS tab when customizing your current theme to get started.
Any CSS changes you make will appear in the preview, just like other changes made in the customizer, this means you have time to tweak and perfect the look of your site, without actually changing anything until you are happy with it all.
Keep in mind that the CSS changes are tied in with your theme. This means that if you change to a new theme, your custom CSS styles will no longer be active (of course, if you change back to your previous theme, they will once again be there).
Page templates
Overview
The Transfers WordPress theme comes with the following custom page templates. If you have skipped sample data import, we advise you to create each page, for a complete experience of the theme:
- Transfers Home page
- Advanced Search page
- Booking form page
- Blog page
- Contact Us page
- Contact Us page (Contact form 7 plugin support)
- Destination list page
- Faq list page
- Login page
- Page with sidebars (none, left, right, both)
- Register page
- Reset password page
- Services list page
- User account page
How to create a new page?
- Navigate to Pages and click Add New.
- Insert a new name for your page, then find the Page Attributes box on right side.
- Set your Parent page; it's usually set to No Parent.
- Set your template from the dropdown list.
- Click Publish.
In addition, the Transfers WordPress theme provides the following single post templates:
- Single Destination
- Single Blog post
Transfers Home page
By default, WordPress shows the blog index page (index.php) with a list of blog posts in your blog as your home page.
To display the Transfers custom home page, please create a new page using the Home Page custom page template. To do this go to Pages > New Page in your WordPress admin dashboard, enter a title, select Home Page from the templates dropdown and click Publish.
Once done, go to Settings > Reading while still in the admin dashboard and under "Front page displays" select "A static page" and select your newly created home page from the dropdown.
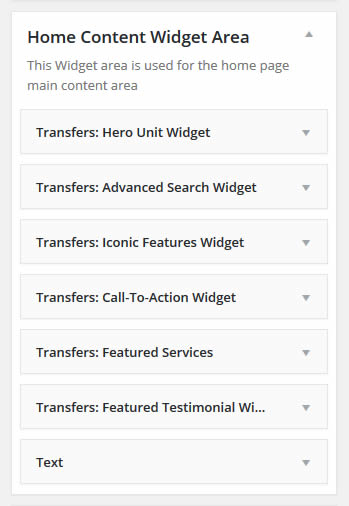
The Transfers home page is completely widgetized. As such, it allows you to dynamically add widgets to its sidebars through the Appearance > Widgets admin section. The sidebar used on the Transfers home page is the "Home Content Widget Area" which is described in section later on in this text.
To get your home page to look like our demo website, simply add the "slider revolution", "advanced search", "iconic features", "call to action", "featured services", "featured testimonials" widgets to the Home Content Widget Area sidebar.
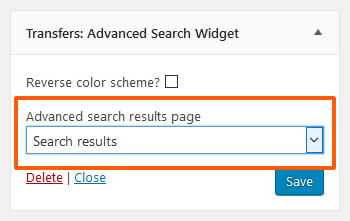
Advanced search page
Please create this page by going to Pages > Add New in your WordPress admin dashboard. Enter a title of your choice and select Advanced search page from the Template dropdown.
For the search to use this page, go to Appearance > Widgets and select this page inside the Transfers: Advanced Search widget as shown in the picture.
Contact page
Please create this page by going to Pages > Add New in your WordPress admin dashboard. Enter a title of your choice and select Contact Us from the Template dropdown. Once you do this, add this newly created Contact Us page to your menus. Adding pages to menus is further explained in the Menus section of this document.
Make sure you have a Google Map API Key. Google Maps has made a change that now requires a google map API key. Once you have obtained your API key, go to Appearance > Theme Options > Configuration settings to place your API key that you make from Google.
Blog
If you wish for your site to have a Blog sub page, you can create a Blog index subpage by going to Pages > Add New in your WordPress admin dashboard. Enter a title of your choice and select Blog from the Template dropdown. Once you do this, the only other thing you need to do is add this newly created Blog page to your menus.
Login
Important
To enable user registration on your website go to Settings > General and enable "Anyone can register" first.
After you create these pages make sure to set page settings up by navigating to Appearance > Theme Options > Page settings.
To use custom login, register and reset password pages you must enable Override wp-login.php by navigating to Appearance > Theme Options > Configuration Settings
Under Appearance > Theme Options > Configuration Settings you can also add captchas to forms and allow users to specify their own passwords when registering.
The Login template allows you to create a custom login page for your website. Go to Pages > Add New in your WordPress admin dashboard. Enter a title of your choice and select Login from the Template dropdown. Once you do this, add this newly created Login page to your menus.
You can further configure the behaviour of your website with regards the Login process by going to Appearance > Theme Options and accessing the Configuration Settings tab. You can completely override the WordPress default wp-login.php page. You also have to select your newly created Login page under the Login page url option in the Theme options > Page settings section for this to work properly. Make sure you click Save Options button before leaving this section.
Register, Reset password and My Account pages
Similar to the above Login page, you should create the Register, Reset Password and My Account pages. For the pages to be fully functional, you must select them under the Page Settings tab of Appearance > Theme Options and hit the Save Options button.
Pages with sidebars (none, left, right, both)
When you create a New Page with the default page template, and you click save, a meta box will appear below the main content box where you can select sidebar positioning. You can create pages with no sidebars, left sidebar, right sidebar or both sidebars this way. Once you do this, add this newly created Page with both sidebars page to your menus.
Single destination
The single destination template is utilized implicitly by WordPress when you create destination posts in the WordPress administration dashboard. You create a new destination by going to Destinations > Add New Destination section. The destination datatype is further explained in the section labeled Destinations.
Single blog post
The single blog post template is utilized by WordPress implicitly when you create a new blog post. You create a new blog post by going to Posts > New Post.
Destination list
The Destination list template allows you to create lists of destinations. Once you create Pages by going to Pages > Add New and selecting an appropriate template, you can add them to the primary menu as explained earlier. Also, once you hit the publish button, further options to filter destinations that are displayed on this newly created page will appear in the meta boxes section of the page.
Faq list
The Faq list template allows you to create lists of faqs. Once you create Pages by going to Pages > Add New and selecting an appropriate template, you can add them to the primary menu as explained earlier.
Service list
The Service list template allows you to create lists of services. Once you create Pages by going to Pages > Add New and selecting an appropriate template, you can add them to the primary menu as explained earlier.
Booking form page
The booking form page template lets you create the booking form page. It is the booking form that the advanced search redirects the user to after the user selects the transfer they want to book.
Smart page templates

For some custom page templates additional options will appear after you publish the page. Besides sidebar layout selection, you will be able to fine tune your content to the last detail.
This theme supports a number of sidebars. They include the following:
- Left sidebar
- Right sidebar
- Footer sidebar
- Above footer sidebar
- Home main content sidebar
We have also created custom widgets to be used with Transfers theme including the following:
- Transfers About widget
- Transfers Contact widget
- Transfers Social widget
- Transfers Advanced Search widget
- Transfers Call To Action widget
- Transfers Featured Posts widget
- Transfers Featured Services widget
- Transfers Featured Testimonials widget
- Transfers Hero Unit widget
- Transfers Iconic Features widget
To display a widget in a sidebar, drag the widget into the sidebar with your mouse. After you modify a sidebar widget's content, click the Save button to save changes.
Transfers About widget
This widget we used to display the "About Transfers" text in the footer sidebar.
Transfers Contact widget
This widget we used to display the "Need Help?" content in the footer sidebar.
Transfers Social widget
This widget we used to display the "Follow Us" icon-buttons in the footer sidebar.
Transfers Advanced Search widget
This widget we used to display the "Find a transfer" search widget in various sidebars across the site.
Transfers Call To Action widget
This widget we used to display the "Like what you see" call to action widget on the home page and also in various sidebars across the site.
Transfers Featured Posts widget
This widget we used to display the "Featured Posts" list of posts on the home page and also in various sidebars across the site.
Transfers Featured Services widget
This widget we used to display the "Featured Services" list of members on the home page and also in various sidebars across the site.
Transfers Featured Testimonials widget
This widget we used to display the "Testimonials" on the home page and also in various sidebars across the site.
Transfers Hero Unit widget
This widget we used to display the "Hero Unit" hero unit at the top of the home page.
Transfers Iconic Features widget
This widget we used to display the "Iconic Features" iconic feature services on the home page and also in various sidebars across the site.
Preview of all available icons with respective css classes can be found in /fonts/icons_preview/demo.html.
You can create unlimited custom sidebars and display them on all or specific pages.
WooSidebars is a plugin that you can use for creating your own widget areas that would then be listed in Appearance > Widgets. Once you install & activate the plugin, navigate to Appearance > Widget areas > Add new. Call it "Right Sidebar Contact page" for example, set it to override the "Right Sidebar" and define on what page would it be shown (contact page in this example). Save settings.
Then navigate to Appearance > Widgets, locate this new "Right Sidebar Contact page" sidebar and place your widgets there. Repeat these steps for all custom widget areas.
Translation basics
internationalization and localization are terms used to describe the effort to make WordPress available in languages other than English for people from different locales. The actual localization is done using the GNU gettext framework, which is used by WordPress itself including the themes and plugins.
Transfers is ready for localization via .po/.mo files, and works with the WPML plugin.
If you are not familiar with translating Wordpress themes, we recommend you read this codex page: http://codex.wordpress.org/Translating_WordPress
Translating WordPress or Transfers theme
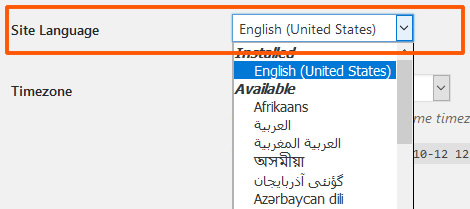
Before you do anything else: Go to Dashboard > Settings > General, scroll to the bottom of the screen and select your website language from the Site language field.
Translating with POEdit
To download POEdit, follow this link. Pro version is NOT required.
- Open the languages/default.pot in POEdit by selecting the Create New Translation button. Once it has loaded, You will find all English text strings in the left column called Source Text. Once you add translations, they will show up in the right column under Translation.
- Choose the line you want to translate. In the lower right section of the POEdit window, you will find a text area where you can add the correct translation.
- When you are done translating all the needed text strings into your desired language, save the file with your language code, for example, if you were translating to the German language, you would save it as de_DE.po. The corresponding .mo file will be automatically created.
Where to upload these files?
There are 2 options:
1. In the theme folder:
You can place your .mo and .po files inside the languages folder that is located inside the theme: wp-content/themes/Transfers/languages.
Note that you will have to always create a backup of these files before updating the theme. This folder will get deleted during the automatic theme update.
2. In the wp-content folder:
Placing the files inside wp-content/languages/themes is the recommended method, because this folder will not get affected during a theme upgrade.
However, in this case, you will have to name your .mo and .po files differently. They must be called transfers-de_DE.mo and transfers-de_DE.po in order to take effect.
If you do not have a folder called languages inside the wp-content folder, simply create one. The same goes for the "themes" folder that must be located inside.
Translating with WPML
Transfers theme was tested with WPML plugin and is fully compatible. If you want to have multilingual website, this is the best way to do it. If you want to use this plugin, you must purchase it first and then install into your wordpress installation. If you’ve purchased WPML and have any questions or issues, please check the links below.
Click Here To Buy WPML Plugin
Using RTL languages
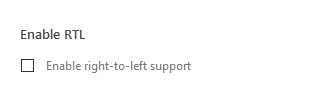
Transfers supports RTL (Right-to-Left) languages with no extra coding required.
A RTL stylesheet is build directly into the theme and you can enable it with one click by going to Appearance > Theme Options > Configuration settings.
Change a single keyword
Important
Do not use this method to translate your website. This is only useful if you want to quickly edit a keyword or two, when not translating your website.
The best way to change keywords is to make a translation with POEdit as described above.
But when you want to change only a few keywords a faster solution might be desired. This is where the Say What? WordPress plugin comes in handy. Simply enter the current string, and what you want to replace it with and the plugin will automatically do the rest.
Once activated, go to Tools > Text changes in your Admin and click the Add New button at the top of the page.
Original string - This field is for the text you are attempting to change. If you want to change the "Item Name" text string, so that is exactly what you would enter into the field. Note: This field is case-sensitive. That means you must enter the text exactly as it is displayed. "Item Name" and "item name" are not the same text string.
Text domain - transfers
Text context - Leave blank
Replacement string - The text you place in the Original string field will be replaced by whatever you put in this field.
Transfers Plugin
Transfers Plugin provides all vital functionality of the Transfers theme. This plugin must always be activated in order for you to have all functionality of the theme.
WooCommerce
WooCommerce is a free eCommerce plugin that allows you to sell anything, beautifully. Built to integrate seamlessly with WordPress, WooCommerce is the world’s favorite eCommerce solution that gives both store owners and developers complete control.
Slider Revolution
Slider Revolution is an external plugin that is included with the theme because for each product, we purchase an "Extended” license which allows us to distribute the plugin within our themes.
Transfers theme does include updates for our premium plugins however, this does not mean that you will receive an individual license for these. Due to Envato’s licensing rules, we can only issue updates for these plugins when we issue a theme update. You can always get current slider version directly from us if you need it. To do so, simply open a ticket at our support center and we will provide the latest version for you.
With WooSidebars, it’s possible to change the widgets that display in a sidebar (widgetized area) according to a context (for example, a specific page, a specific blog post, certain categories or the search results screen). Setting up a custom widget area to display across multiple conditions is as easy as a few clicks.
General WordPress settings
WordPress general settings control some of the most basic configuration settings for your site: your site's title and location, who may register an account at your site, and how dates and times are calculated and displayed.
Site title
Enter the name of your site (or blog) here. Most themes will display this title, at the top of every page, and in the reader's browser titlebar. WordPress also uses this title as the identifying name for your Syndication feeds.
Tagline
In a few words, explain what your site is about. Your sites's slogan, or tagline, might be entered here. A tagline is short phrase, or sentence, used to convey the essence of the site and is often funny or eye-catching.
WordPress Address (URL)
Enter the full URL of the directory containing your WordPress core application files (e.g., wp-config.php, wp-admin, wp-content, and wp-includes). For example, if you installed WordPress into a directory called "blog", then the WordPress address would be http://example.net/blog (where example.net is your domain). If you installed WordPress into your web root, this address will be the root URL http://example.net. WordPress will trim a slash (/) from the end. If you defined the WP_SITEURL constant in your wp-config.php file, that value will appear in this field and you will not be able to make changes to it from the WordPress administration screen.
Site Address (URL)
Enter the address you want people to type in their browser to reach your WordPress site. This is the directory where WordPress's main index.php file is installed. The Site address (URL) is identical to the WordPress address (URL) (above) unless you are giving WordPress its own directory. WordPress will trim a slash (/) from the end. If you defined the WP_HOME constant in your wp-config.php file, that value will appear in this field and you will not be able to make changes to it from the WordPress administration screen.
E-mail Address
Enter the e-mail address to which you want WordPress to send messages regarding the administration and maintenance of your WordPress site. For example, if you allow new users to register as a member of your site (see Membership below), then a notification will be sent through e-mail to this address. In addition, if the option, An administrator must always approve the comment, is set in Administration > Settings > Discussion, this e-mail address will receive notification that the comment is being held for moderation. Please note this is different than the address you supplied for the admin user account; the admin account e-mail address is sent an e-mail only when someone submits a comment to a post by admin. The address you enter here will never be displayed on the site. You can send messages to multiple admins by using an email address which forwards email to multiple recipients.
Membership
Anyone can register - Check this checkbox if you want anyone to be able to register an account on your site.
New User Default Role
This pull-down box allows you to select the default Role that is assigned to new users. This Default Role will be assigned to newly registered members or users added via the Administration > Users > Users Screen. Valid choices are Administrator, Editor, Author, Contributor, or Subscriber.
Timezone
From the pulldown box, choose a city in the same timezone as you. For example, under America, select New York if you reside in the Eastern Timezone of the United States that honors daylight savings times. If you can't identify a city in your timezone, select one of the Etc GMT settings that represents the number of hours by which your time differs from Greenwich Mean Time. Click the Save Changes button and the UTC time and "Local time" will display to confirm the correct Timezone was selected.
Date Format
The format in which to display dates on your site. The Date Format setting is intended to be used by theme designers in displaying dates on your site, but does not control how the date is displayed in the Administrative Screens (e.g. Manage Posts). Click the Save Changes button and the "Output" example below will show the current date in the format entered. See Formatting Date and Time for some of the formats available.
Time Format
The format in which to display times on your site. The Time Format setting is intended to be used by theme designers in displaying time on your site, but does not control how the time is displayed in the Administrative Screens (e.g. Write Post edit of timestamp). Click the Save Changes button and the "Output" example below will show the current time in the format entered. See Formatting Date and Time for some of the formats available.
Week Starts On
Select your preferred start date for WordPress calendars from the drop-down box. Monday is the default setting for this drop-down, meaning a monthly calendar will show Monday in the first column. If you want your calendar to show Sunday as the first column, then select Sunday from the drop-down.
Site Language
The WordPress dashboard language.
Theme updates
Important
All your data is safe because theme file updates do not change anything in the database.
It is still recommended to always make a backup of your files and database prior to updating.
The following steps outline how you should upgrade the Transfers theme:
- Put your WordPress website into maintenance mode. You can do so either
a) by using a plugin or
b) by uploading an empty file called .maintenance to the root folder (where WordPress is installed) like described here
- Delete all files and directories inside Transfers theme folder (usually this is wp-content/themes/Transfers)
- Unzip the new Transfers.zip file (found inside the big zip file downloaded from ThemeForest) and upload all files and directories from the zip to server into above mentioned Transfers theme directory.
- Put site out of maintenance mode (either delete .maintenance file or switch off maintenance via plugin if plugin was used).
- Browse to admin and check that everything is ok.
- Check theme settings - switch off/on new features etc.
Plugin updates
The following steps outline how you should upgrade the Transfers plugin:
- Delete all files and directories inside the wp-content/plugins/transfers-plugin
- Unzip the new Transfers.zip file (found inside the big zip file downloaded from ThemeForest) and locate the includes/plugins/transfers-plugin
- Copy the contents of the includes/plugins/transfers-plugin inside the wp-content/plugins/transfers-plugin
Basic troubleshooting
Theme is missing the style.css stylesheet error
The reason you may receive this error is if you have uploaded the incorrect file. Make sure to upload the Transfers.zip file (and not the Transfers_WP_Theme.zip file!)
Are You Sure You Want To Do This?
If you get this message when installing the theme via WordPress, it means you have an upload file size limit that is set by your host. If this happens, please install the theme via FTP or contact your hosting company and ask them to increase the limit.
Parse error: syntax error, unexpected 'global' (T_GLOBAL) on line 1
Your ftp client has jumbled php files. To prevent this in the future, you must always upload php files in Binary transfer mode (any code files, not just our theme).
To fix this, if for example using FileZilla, please go to Transfers > Transfer Mode > select Binary and then upload all theme files again.
If you require technical assistance please open a new ticket at our support center. We are happy to help.